Adobe Photoshop is the top choice when it comes to photo editing whether you are a professional photographer or a novice in the industry. For those who are always on the go and are looking for an alternative, try using Fhotoroom. It’s an app which delivers almost similar results as the Adobe.
The App That Delivers
Some of the most popular photo editing apps are only available for Android and iOS devices. So, does it make Windows-based smartphones less attractive? We don’t think so. There’s a certain app that provides Windows mobile users an image enhancing power like no other.
Fhotoroom is designed primarily for Windows mobile users which you can use from taking a photo to creating a design concept. This allows users to edit and to share their artwork on their social networking sites. Especially with the Pureview Technology equipped on the latest Lumia 928 that is only available at www.verizonwireless.com, pictures are going to be as vibrant and crisp on mobile.

How to use the Fhotoroom
To enjoy the app, you just have to follow some basic steps:
1. Go to the Windows app store by clicking the link here.
2. Download the app to your phone. When you’ve installed it completely, tap on it to run the program. Upon installation, you will be given some basic instructions on how to use it.
3. Now that you have the app up and running, you can start editing your photos, you can choose to take new ones or edit those which you already have. There are so many effects to choose from. You can start by using basic functions like adjusting contrast, sharpening, saturation and more. Once you are satisfied with the basic editing, you can then apply effects like sepia and rose filters among others.
4. Transforming images are possible, too. Resize and crop your photos according to your needs before applying lighting effects. Users can also choose to add a texture or use a frame as a border to an image.
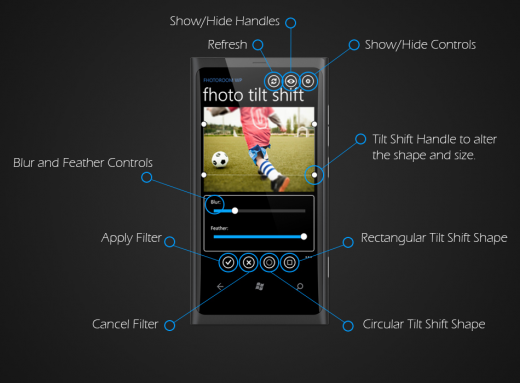
Yes, there are just so many things that you can do using this free app such as the Tilt Shift. It is a creative way of presenting life-sized images to make them look like miniature models. Real tilt-shift photography requires you to have a dedicated and somewhat expensive lens attached to your equally expensive DSLR body. With Fhotoroom, you can fake the effect and still get a great image. Follow the steps and try it for yourself.
The best photo to use is a landscape scene, usually taken from a high angle.
- Once you have the photo that you like, open it in the Fhotoroom app
- Drag the Tilt-Shift handle to the area that you want to focus on
- Hide the menu and tool icons to preview your image
- Once you are happy with the image, tap on the screen to apply the filter
Share your Tilt-Shift image in your preferred social networking site and see how your friends will think about it.
If you’re happy with the results, you can download the free Fhotoroom HDR app which you can use on your desktop to supplement your basic mobile app. What does it have over the basic Fhotoroom app? It has Digital Camera RAW file support, more filters and effects and of course, the workflow process. These features enable you to create a great High Dynamic Range (HDR) image that you’ve always wanted to create.
Have you tried it yet? Share your images with us by leaving a link in the comments section.
I was using another app on my windows phone but after reading this, I have decided to get rid of that and switching to this.